
As January draws to a close and the days start to get a little longer, it’s time to jump out of hibernation and take care of one of my favorite flowers: the rose. I planted about 100 heirloom roses from David Austin last winter, and in the coming weeks I’ll put in another 25 from Weeks. I can’t get enough! Here are the 5 steps I follow in planting roses.
Rose Planting Guide in 5 Steps
Step 1: Make a plan for your amendments
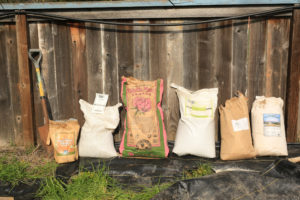
Roses are heavy feeders, so before doing anything, I want to make sure to plan out how I’ll be fertilizing them. This is what I put together last winter to make sure they got a good dose of food at planting time:
Amendments Per Rose Hole:
| Amendment | Purpose | Amount |
| Compost | Organic matter | ½ of the hole |
| Bonemeal | phosphorus and calcium | 2 tablespoons |
| Alfalfa Meal | nitrogen and general fertilizer | 1 cup
|
| Greensand | slow-release potassium | 100 lbs/1000 bed feet |
| Glacial Rock Dust | trace minerals | Light sprinkling |
| Cal-Phos | Cal and phos | 1 cup |
| Mycorrhizae | 1 spoonful on roots |
Step 2: Get Your Beds Ready
We all know it’s both tricky and bad for your soil to dig when it’s too wet. So, in some of our gardens, it’s best to have space prepped in the fall. This is what I did last year in order to have any chance of not completely decimating my soil structure by digging in the mud. This year, I wasn’t so smart and I’ll, in fact, be digging in the mud. If some of you out there are in the same situation, rest assured that it will all be ok. Just try to rely on hand tools rather than rototilling or other mechanical cultivation.
Step 3: Dig Your Rose Holes
I dug holes about 4 feet apart to accommodate the spread of most of my David Austin varieties. Some could get away with being a little closer, and some of the real ramblers would appreciate more space. But I opted for a happy medium while erring on the side of a little more space for more air flow. As we know, fungal diseases are a known enemy to roses and I don’t want to take any chances. The holes we dug were about the size of 5-gallon buckets. I would recommend that as a minimum, if not a bit bigger. In my production system, I decided to also line each hole with gopher wire. This is an extra step but worth it for me.
Step 4: Prepare The Planting Hole With A Cone Of Soil
The goal in planting these roses is to spread out the roots as much as possible in the bottom of the hole. Since the holes we dug were both pretty wide and deep, we needed to replace some soil and compost in the bottom of the hole before setting the rose in. I read somewhere that it’s helpful to pre-fill the hole with some soil in a cone shape so that the rose roots can splay out around it. This is one of those instances where I felt silly for not thinking of it first. It’s brilliant.
Step 5: Plant!
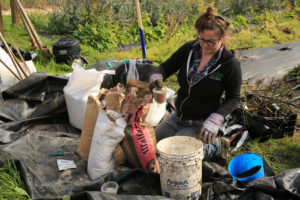
Hopefully, your holes aren’t filling with water from saturated soil as mine were, and this process will be a bit easier for you. Basically, we sat the rose on top of the cone, sprinkled a mycorrhizae on top of the roots (careful to always do it over the hole so that any excess made it inside), and then began filling the hole with soil, compost, and scoops of our chosen amendments that we had pre-mixed in a bucket. We actually found it easiest to have two people work on each plant so that one could shovel soil into the hole while the other scattered amendments and compost as the hole started to fill up. This worked well enough to get everything nice and mixed together. A perhaps more efficient alternative would have been to pre-mix not only the amendments but the compost and some soil as well. Then you could essentially dump the contents of pre-mixed wheelbarrows, buckets or piles into the hole.

And voila! Remember not to plant the rose too deep or too shallow – aim for under the grafting union but well over where all the roots end. Water in well if dry weather is in store, and mulch heavily.
I’ll soon be updating my workshop schedule at B-Side Farm to include rose pruning and maintenance classes for this season. Check out http://www.b-sidefarm.com/workshops/ if you want to get your hands dirty with some rose care this summer!
 Family