4 Easy Steps to Growing Dry Beans in Sonoma County
Happy middle of summer, my gardening friends! If you’re like me, your gardens are bursting with crops by this point. Flowers, summer squash, beans, tomatoes, and cucumbers are in full swing, while cooler spring crops have gone by the wayside. This week, I’m advocating for getting one more crop in the ground and growing dry beans if you have the space.
For those of you who haven’t tried growing dry beans before, I promise you won’t regret adding this easy to grow, nutrient-dense option to your gardens this summer. Plus, your pantry will thank you all winter long because cooking with home-grown dry beans is a great way to stay connected to your garden during the winter, even if not much is growing outside.
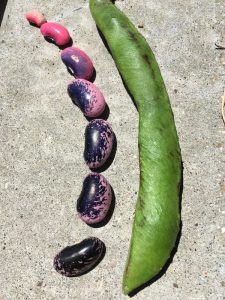
Dry beans are at once simple and confusing. The simple part is that the dry bean is merely a mature version of the fresh-eating bean, left on the plant to mature and harden. What gets a little trickier is figuring out which ones make good dry beans for eating. All beans will dry, but that doesn’t mean we should save them all for eating.
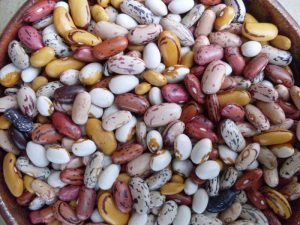
I personally love California Gold Rush and Jacob’s Cattle, but you should browse our local Baker Creek Seed Bank – they’ve got plenty of cool options to choose from. Beans don’t need too much room but they do need a good long day of sun. So whether you’re planting outside in a garden or on the windowsill in a small box, you’re good to go.
Nutritional Benefits of Dry Beans
As someone who was a vegetarian for 20 years, I relied heavily on beans as a major source of protein and iron in my diet – as I know many people do. A cup of cooked beans contains about 16 grams of protein and 20 grams of fiber (almost the daily recommended fiber intake for women). Beans are also packed with B vitamins and minerals such as zinc and iron. We could all stand to incorporate more beans into our diets. And what better way to have access than by growing dry beans ourselves?

Growing Dry Beans in 4 Easy Steps
Step 1: Prep your soil
Depending on your soil type, the weather, and the variety you choose, beans should be ready to harvest anywhere from 90 – 120 days after sowing. In our area you can start sowing beans as soon as the soil is workable, or by about May 1. We’re closing in on the end of the window of opportunity to get them in the ground, but if we have a dry fall who knows – you can try planting them as late as late August.
As always, check your soil moisture before working the ground. When the soil is neither too wet nor too dry, add in a 1 – 3” layer of compost. Beans will fix nitrogen in your soil, meaning they don’t actually require much in the way of added nitrogen. This dose of compost should do it for the season.
After you’ve evenly spread it over the top of your bed or box, work it into the top 6 inches of soil with a fork or trowel. This also gives you an opportunity to break up any huge clods that have formed or, in the case of my heavy adobe clay soil, any rock-like balls of soil that have formed since the last crop. You want to break these up into a nice tilth, making sure your soil is well blended and ready for cultivation. Think about the size of the beans that you’ll be sowing in the ground. When growing dry beans you don’t want any chunks of soil bigger than the seeds themselves.
Step 2: Sow your beans
Beans will do best if sown directly in the ground rather than relying on transplants. To sow your beans, make a little one-inch deep trench in your soil with your finger, trowel, or a pencil. If you are planting beans that like to climb (check the variety on your seed packet), sow two rows on either side of a fence or trellis, allowing the beans to climb up it. This trick makes for easy picking and is a beautiful sight to see in the garden.
Next, sow your beans very close together in the trenches. If need be, you can come back and thin them out to every 2 or 3” if they are too dense, but really they should be fine however you sow them.
If you are growing pole beans and not just bush beans, it’s much easier if you use a trellis. To build a simple and cheap trellis I like to use 3 bamboo stakes (or any small stakes) that are about 4 feet long and some garden twine. I stick 2 of the stakes in the ground about 3 feet apart, and then tie the third one up between the two just a few inches from the top. This will look like a goal post. I then take my extra twine and tie 3 – 4 pieces stretching laterally down from the top, and another 4 stretching horizontally between the two goal posts. You now have a niece big piece of netting that the beans can climb up.
Here is a cute video that demonstrates this method along with others.
Step 3: Water your beans
In wetter climates, many people can grow beans with no water at all. Imagine that! Here in the Sonoma County, I make sure they get a good watering right after sowing. You’ll want to come back every few days with your hose or watering can to make sure that the soil surface doesn’t dry out until the seeds germinate. Once they start forming pods and once the weather gets hot, they’ll need more frequent, deeper waterings. Depending on your soil type, this may even mean daily.
Step 4: Harvest
Most types of beans start setting mature pods about 60 – 90 days after sowing. However, unlike fresh eating green beans, when growing dry beans you’ll want to wait much longer to harvest.
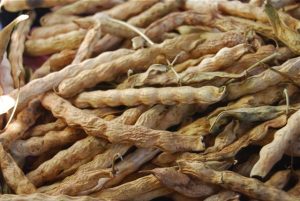
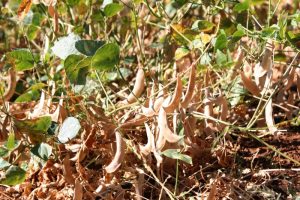
When the pods have started to brown and shrivel, pull a few off the vine and look at the beans inside. When they’re completely hard and dry to the touch, they’re ready! If they’re not quite ready yet you can leave them on the plant a bit longer, just make sure to harvest them before they shatter and you lose them all to the ground.
A quick and dirty way to harvest dry beans is to pull the whole plant, throw a ton of plants on a tarp, and stomp and shake until all the beans fall out. But if you’re just growing a few, you can walk the row and pull individual pods off of plants, take the beans out, and capture them in a bag or box.
After harvest, make sure your beans are totally dry and then store them in airtight containers in a cool, dry place. To cook, replace any beans in your favorite recipes with whatever variety you have grown. When in doubt, boil in a big pot with chicken or vegetable stock and throw in all your favorite veggies.
Enjoy the process! I think growing dry beans adds some of the prettiest vegetation to my gardens.
 Family