Grow Your Own Peas
As the days get longer and our garden soils start to dry out, it’s time to get in there with some delicious spring crops. Who doesn’t love peas? Growing garden peas in a super easy way to ensure that there will always be a quick snack available in your garden. Vine to mouth snacking should be a priority for at least a few crops in your garden this year. With about a million different varieties out there, there’s sure to be a pea for everyone. Snow peas, snap peas, sweet peas – what’s your favorite pea?
Nutritional Benefits of Growing Garden Peas
Garden peas are a great fresh, nutrient-rich addition to any diet. First of all, they contain a good dose of iron – about 2.4 milligrams per cup. When you think about the fact that daily iron recommendations average around 10 – 15 milligrams per day a cup of peas become all the more enticing. Peas are also rich in vitamin A (a cup contains 64% of your daily recommended intake), high in lutein, and of course high in fiber. Depending on the kind of pea I’m eating, the pod is often my favorite part, and offers a heaping serving of fiber. And for those gardeners out there who, like me, love popping the whole pea in your mouth instead of taking the time to shell it, growing garden peas at home is so much better than eating store-bought, conventionally grown alternatives that could be covered in pesticides. If the producer assumes that we are just eating the inside peas and not the pod, who’s to say what kind of pesticide residues linger on the pod? According to the USDA Pesticide Data Program, frozen sweet peas were found to contain very high levels of dimethoate, o-phenylphenol, and omethoate to name a few. I don’t know about you guys, but I’d rather grow my own!
Step 1: Prepare your soil
Early April is a great time to plant peas and, at least this year, the soil is probably dry enough to get in there and start. I’ve talked before about the importance of soil moisture, and this is always worth thinking about. Once you deem it ready, it’s time to prepare your bed. Add in a layer of compost that is anywhere from one to three inches thick, depending on how much help you think your soil needs (we’ll talk another time about soil tests and what they can tell you).
Peas themselves don’t need too much added nutrition, but it’s always a good practice to amend your soil before a new planting. After you’ve evenly spread compost over the top of your bed or box, work it into the top 6 inches of soil with a fork or trowel. This also gives you an opportunity to break up any huge clods that have formed or, in the case of my heavy adobe clay soil, any rock-like balls of soil that have formed over the winter. You want to break these up into a nice tilth, making sure your soil is well blended and ready for cultivation. Think about the size of the peas that you’ll be sowing in the ground. When growing garden peas you don’t want any chunks of soil bigger than the seeds themselves.
Step 2: Sow your peas
Much like cucumbers, carrots, and beets, peas don’t love having their roots disturbed, making them a prime candidate for direct sowing in the ground. Here I’ll rely on the age-old saying “Do as I say, not as I do,” for at Petaluma Bounty we are indeed sowing our peas in 2″ pots in the greenhouse in order to get a jump on the season outdoors. The plants may well do fine, but root disturbance will probably decrease pea yields as the season goes on. I’ll let you know how the experiment goes! For home gardeners, I would suggest using pea seeds as an easy introduction to direct germination if you haven’t done so before.
To sow your peas, make a little one-inch deep trench in your soil with your finger, trowel, or a pencil. I like to sow two rows on either side of a fence or trellis, allowing the peas to climb up it (which makes for easy picking and is beautiful in the garden). Then sow your peas very close together in the trenches. Unlike many vegetables, they will perform better when crowded and even touching. There is no need to come back and thin – just sow and let ‘em grow!
Growing garden peas effectively is much easier if you use a trellis. To build a simple and cheap trellis I like to use three bamboo stakes (or any small stakes), about 4 feet long, and some garden twine. I stick two of the stakes in the ground about 3 feet apart, and then tie the third one up between the two just a few inches from the top. This will look like a goal post. I then take my extra twine and tie 3 – 4 pieces stretching laterally down from the top, and another 4 stretching horizontally between the two goal posts. You now have a niece big piece of netting that the peas can climb up.
Here is a cute video that demonstrates this method along with others.
Step 3: Water your peas
When growing garden peas, make sure they get a good watering right after sowing. Come back every few days with your hose or watering can to make sure that the soil surface doesn’t dry out until they germinate. Once they start forming pods and once the weather gets hot, they’ll need more frequent, deeper waterings. Depending on your soil type, this may even mean daily waterings.
Step 4: Harvest
Most types of peas start setting mature pods about 60 – 90 days after sowing. Peas approach maturity when the pods are shiny, bright green, and round. If the peas have begun to stretch the sides of the pod, showing little mountainous bumps, you have probably left them on the vine too long. You should be able to squeeze the pods and feel the peas move around inside a little bit. When in doubt, taste them!
When picking your peas, be careful not to dislodge the plants’ delicate root systems. Use two hands if possible, holding the vine with one and pinching off the peas with the other. It’s important to keep harvesting the peas when they’re ready, even if the harvest exceeds your dinner plans. If you don’t constantly harvest, the plants will start slowing down their production. I like to harvest all that are ready every three days or so, and freeze the extras or share with neighbors.
Next time on the blog we’ll be interviewing Jordan Thompson of Heidrun Meadery. Jordan is an excellent plants-woman and is tasked with the role of creating lush, diverse bee habitats out in Pt. Reyes Station. We’ll be chatting bees, native and flowering plants, coastal climates, and more. Until then, sow some peas! Below is a great recipe to try out after your first harvest of garden peas. Do you have a favorite garden pea recipe or growing tip? Share with us in the comment section below.
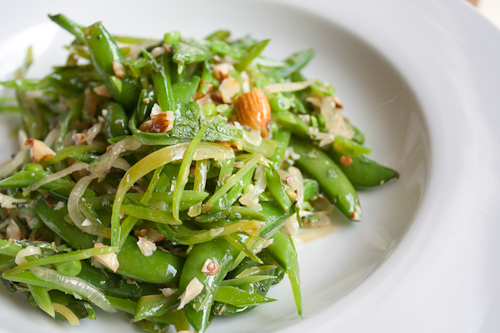
Sugar Snap Pea Salad with Mint, Almonds, and Caramelized Onions
Recipe and Photo Source: KQED’s Bay Area Bites
Prep time: 5 min
Cook time: 25 min
Total time: 30 min
Yield: 4 servings
Ingredients
- 1 pound sugar snap peas
- 1/2 medium onion
- 1 handful fresh mint leaves (about 1/4 cup chopped)
- 1/4 cup almonds
- 1/4 cup rice vinegar
- 1/4 cup olive oil
- 1 teaspoon lemon zest (from 1 lemon)
- 2 tablespoons lemon juice (from 1/2 lemon)
- Salt to taste
- Pepper to taste
Instructions
- Bring a pot of salted water to a rolling boil.
- Meanwhile, chop the onion into half moon slivers. Allow to caramelize over medium-high heat in an oiled sautee pan (about 25 minutes).
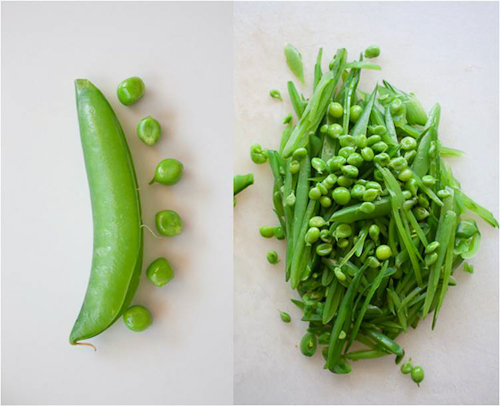
- Wash the sugar snap peas and de-string them if necessary, snapping the tip and removing the fibrous strand running lengthwise. If the snap peas are young though, you won’t have to do this. Drop the sugar snap peas into the pot of boiling water. Cook for 2 minutes, then strain out and drop them into an ice bath.
- Once the snap peas are cooled, strain them out and place half of them in a large bowl. Shell the other half, adding the peas to the bowl. Julienne the remaining pod shells lengthwise and add to the bowl.
- Roughly chop the mint leaves. Toast and roughly chop the almonds. Add mint, almonds, and caramelized onions to the bowl.
- Mix together the rice vinegar, olive oil, lemon juice and zest, and drizzle over the salad. Toss well, add salt and pepper to taste. Serve at room temperature or chilled.
 Family